My husband likes Cabbage Rolls, or Golumpki as I have always known them to be. I decided there needed to be an easier way to make them so...since I love skillet meals, that is what I decided to do. Super easy, super fast to put together and cook. Super Yummy!
You will need:
Cabbage (6-8 leaves)
1 pound ground beef
1 1/2 C tomato sauce (I use a basic marinara)
1 can diced tomatoes
1 C prepared rice
1-2 T Worcestershire sauce
Directions:
1. Prepare rice...sometimes I use minute rice and I cook it in the microwave while I start prepping meat and cabbage leaves. Uncle Ben's rice pouches work well too...whatever you prefer.
2. Mix rice, ground beef, Worcestershire sauce, 1 C of diced tomatoes, and salt and pepper in a large bowl.
3. Pour the rest of the diced tomatoes and the tomato sauce into a large skillet. Turn skillet onto med-high heat.
4. Form ground beef mixture into large meatballs. I use a 3/4 C measuring cup to divide up.
5. Place the large meatball into the center of a cabbage leaf and put into skillet, continue until skillet is full.
Cover and cook for about 10 minutes. Uncover and tuck ends of now wilted cabbages around the 'meatballs" to form more of the traditional cabbage roll. Cover and simmer for another 10-15 minutes or until done through.
6. Serve with sauce on top.
Enjoy!
About Me
- Marie97
- I am a SAHM mother of three...only one left home though. Paper crafting is my passion...I love creating things and saving memories. I also enjoy reading, baking, spending time with my friends and family, and walking my two furry children. My goal on my blog is to share something a little crafty, something yummy, and something fun every week. Thank you for visiting & comments are appreciated :)
Wednesday, March 28, 2012
Tuesday, March 27, 2012
Lucky to Know You Card
Cute little card I made for the Dutch Dare Challenge this week. The theme: Cute & Cuddly, so this image was perfect. Now the details:
Image: Pixie Dust Studio - True Love
Sentiment: Stampin' Up
Papers: from my scrap stash
Extras: Inked all edges with Chestnut Roan Chalk Ink, buttons with floss knots, ribbon, Crystal Effects on the eyes and noses.
Thanks for looking!
Image: Pixie Dust Studio - True Love
Sentiment: Stampin' Up
Papers: from my scrap stash
Extras: Inked all edges with Chestnut Roan Chalk Ink, buttons with floss knots, ribbon, Crystal Effects on the eyes and noses.
Thanks for looking!
Monday, March 26, 2012
Pick 3 for the Week of 3/26/12
Easter is almost here and we have been having lovely weather...I think my picks reflect that my thoughts have turned to Spring!
1. Mo's Digital Pencil - A new digi shop I found...and love. Her images are so cute and whimsical. I have already purchased several...and more are on the wish list. She also has a challenge blog...I entered this past week (see my previous blog entry for info). Check her out!
2. Peeptini - I originally saw this on Pinterest, but it did not have a good link back to its source, so...I went hunting. I found several different recipes, but I really liked this one because they give you variations to use based on the color of peep you are using. Can't wait to give this one a try.
3. Hamantaschen - No, I am not Jewish, however, when we lived in Maryland several of our neighbors were. They used to make these for Purim an share them with us. I absolutely love them. They typically used a strawberry or apricot filling. They are like a little bit of pie. So, since we do not live in Maryland anymore I went on a search for a recipe...this one got great reviews so I will give it a try.
Enjoy! Let me know if you give any of these a try and what you think.
Friday, March 23, 2012
Teen Fairy Mia
Decided to combine a couple challenges this week:
Pixie Dust Studio Challenge #119: Your Favorite things
Mo's Challenge #127: "Bling It On"
Charisma Cards Challenge: Pocket Cards
And here is what I came up with:
I started with one of my favorite folded cards a double pocket card. I used a 12x12 sheet of paper, but you can use other sizes. I used a digi image from Mo's Digital Pencil: Teen Fairy Mia. I colored her with Stampin'Up pencils and then added bling...stickles and glitter. I used Spellbinders for the image mat and tag.
The ribbon is not attached, but used as a band so that you can open the card. The image is only attached on the bottom half so both pockets are usable. Typically I put a tag with a sentiment or another image in the first pocket and then a little treat in the second pocket...candy, tea, hot cocoa, etc.
I used several of my "favorite things" making this card...
1. My favorite fold technique
2. Bling of all kinds! Glitter, Stickles, rhinestones, pearls....
3. Silky ribbon
4. Fun fibers on the tag
Thanks for looking :)
Tuesday, March 20, 2012
PDS: Ariel
Loved the sketch challenge this week at Pixie Dust Studio, that I had to join in. When I first looked at the sketch I though it was a little plain, but then...Once I started creating, I realized it was a good foundation that could be transformed.
I used PDS: Ariel digi stamp. I colored her with Stampin' Up pencils. I mounted her on teal card stock. The background papers are some older Heidi Grace that I had in my stash. I added some Jolee's glitter stickers for the fish and coral, clear rhinestones, and an epoxy silver glitter flourish.
I think she is adorable....now who to give her to ???
Lilac Bouquet
Cute spring themed card to celebrate the 1st day of Spring!
I used a favorite stamp of mine: Stampabilities, Lilac Bouquet. I used the sketch from this weeks sketch challenge on Card Positioning Systems. I did flip it...it just fit the shape of my image better that way.
I colored with Stampin' Up pencils. All the papers are from my scrap basket. I used a border punch to make a piece of paper lace. Added some flowers with rhinestone brads...done!
I am entering this card into the following challenges:
ABC Challenge: Lavender and Lace
Card Positioning Systems: Sketch # 257
Sunday, March 18, 2012
Pick 3 for the Week of 3/19/12
1. Chocolate Dipped Peeps These are so festive looking...they are definitely on my make list for the holiday...and chocolate can only make Peeps better!
2. Ribbon Spooler & Organizer I have been on an organizing mission in my scrap room. I came across this nifty little tool at Paper Wishes...I was a little skeptical, but it worked great! I re-rolled all my ribbon and threw out the bulky cardboard centers. I went from 3 draws of ribbon to one!
3. Bo Bunny Ambrosia Collection While this collection was released at the Winter CHA, I really hadn't paid attention to it...I think it is all the lovely spring colors...I just wasn't ready for them until now ;) I can't wait to create with them! Of course, Bo Bunny can never go wrong in my opinion.
Hope everyone had a fun St. Patrick's day....on to Easter!
Friday, March 16, 2012
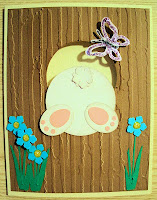
Bunny Butts are the Cutest!
So, was working on a set of swap cards and I wanted something similar to this...
This is a layout I did a couple of years ago when I was teaching. I loved the bunny butt in the basket and I wanted to do something similar, but I did not want to do a tear animal, so...This is what I came up with...
I did more of a "punch art" bunny butt...However, I do not have a lot of large punches so I used my Creative Memories Circle cutting system to cut the bunny butt and feet. The flowers, bunny tail, and pads of the feet are punches. His toes are a regular hole punch. And, the butterfly and greenery are Criut Cuts. I wanted it to look like he was jumping into his home in a a tree so I used my Cuttlebug to emboss the brown card stock. After everything was assembled I used Distress Walnut ink to add dimension to the 'wood' and Cat's Eye Chalk Ink in oyster for the bunny. And, of course, Stickles to the butterfly and flowers.
Wednesday, March 14, 2012
Bunny Wreath
I made this wreath for one of my participants in my Craft it Forward post on Facebook. This is the second year I have done this...you put a post up in January asking for 3-5 people to join you in Paying it Forward, craft style. The only catch is, if they sign up to receive a craft from you, they have to share the same post and then 'craft it forward" themselves. So, this was for my first person...
I was inspired by a wreath I saw on Pinterest, but I wanted a little more, so after wrapping a Styrofoam wreath with Fun Fur yarn (it took 2 skeins), I added a stuffed bunny and glittery eggs. I only pinned them in so she can change them out after Easter if she likes. I think I am going to have make one for myself now...he is just so cute!
Sunday, March 11, 2012
Pick 3 for the Week of 3/12/12
I thought it might be fun to start sharing my "Pick 3" for the week...three links to three things I found interesting, useful or fun. You might get some great ideas, find some fun blogs to look at, or some delicious recipes to try. Just another way to share. My goal is to post my "Pick 3" every Monday.
So here is our first Pick 3:
Since St. Patrick's day is this coming Saturday, I focused on things that were green.
1. Mint Chocolate Chip Cookies I made these last year for Ladies Night and they were a hit. Best part, it is a semi-homemade recipe! They come out a very pretty green and have a delicious minty taste.
2. Irish Kiss Since I am not a beer drinker, I was looking for a fun drink for St. Patrick's and I came across this one...champagne and melon liqueur with a little green food coloring and sugar. The site has several other fun drinks to check out.
3. St. Patrick's Day Treat Jar I love this idea...and you could make it fit any holiday. My son is going on a youth retreat this weekend and will not be home for St. Patrick's day, so I think I am going to put one of these together and hide in his suitcase. I think I will try to find a plastic bottle though :)
Enjoy! Let me know if you try any of them & what you think.
Saturday, March 10, 2012
Jar of Flowers Card
This was a "just for fun" card. I loved the image so...I colored the image with my Stampin' Up pencils. I used my Creative Memories oval cutter for the image and mat. The pattern paper is from my scrap box. I am not very happy with the red ribbon on the image...contrasts too much with the soft colors of the card, so...I am going to go back and turn it to orange. Other than that, I like it :)
Wednesday, March 7, 2012
Just Swingin' Card
This is the sketch I gave my FB group this month. It is from: Stamping Queen Sketch
This is what I did with it...
The digi is from Pixie Dust Studio .
I colored him with my pencils and cut/embossed image with a Spellbinders. I used scraps of paper for the background. I inked all edges. I just used a circle punch to make the cherries in the corner; and I free handed the leaves. Again, I inked edges. I pop dotted the cherries and the digi. All done!
Monday, March 5, 2012
Banana Foster Crepes
Tonight I decided to experiment with my crock pot...since I currently have no range ;) We have a new one on order, but...it will be a week before it arrives. So, I had seen this recipe for crock pot bananas on Pinterest and wanted to try it, but after reading the recipe I decided it needed a few changes. My end result was a bananas foster crepe.
You will need:
4-6 bananas
1 C. shredded coconut
1/2 C.chopped pecans
1/2 C. butter
1/2 C. light corn syrup
1/4 C. brown sugar
1 t. cinnamon
1 T. lemon juice
1 t. lemon zest
2 T. rum
crepes (homemade or store bought)
whipped cream
vanilla ice cream
Cut bananas into 2 inch pieces and place in bottom of crock pot. Top with coconut and pecans.
Melt butter; whisk in all other ingredients to form a syrup. Pour syrup over banana mixture in crock pot.
Cook on low setting for 1-2 hours.
If using prepared crepes, warm. Fill warmed crepe with bananas, roll and place on plate. Top crepe with ice cream, whipped topping and more bananas and syrup.
My taster....he declared them "really good".
ATC: Paris in the Spring
I made this ATC for a swap I am in. The theme was 'Flower Power"...I got a little off, but I love it. I came across the vintage image of Paris and just knew I wanted to use it, so...I printed it out in sepia tones, mounted to chipboard, and stained the edges with black Stayz On ink. I added: some silver pen marks to the tower, a rhinestone on the letter "P", and a fleur de lis brad for added detail. Finally, for the flower power, I added a handmade flower in the corner.
On another note...my Blog was nominated for an award...
It is for Blogs with less then 200 followers, and I am honored...
I want to thank Corinne at Wish Upon a Scrap for the award. HUGS!!!
Now I have to pass this on to 5 other blogs with less then 200 followers!
The 5 blogs I have picked are:
Don't Worry- Be Scrappy
Crafty Chick Designs
Getting Hooked
Scrappin' Lizzi
Scrappin' Away 2day
Don't forget to Grab this button...and make sure you pass it along to 5 other blogs....:-)
Saturday, March 3, 2012
Peter the Rabbit Card
In keeping with my goals for March I decided to work on some challenges this evening. After printing this little bunny digi (Peter the Rabbit from Pixie Dust Studio) I just went with it.
I colored him using my Stampin'Up pencils and blending with Gamsol. I added Crystal Effects to his eyes, nose and mouth for dimension. I used a Spellbinders to cut the blue layer. All papers are from my scrap bin; I inked the edges of all in Cats Eye Chestnut Roan. I added a brown grosgrain bow and layered buttons for embellishments.
I am entering this card in the following challenges:
Pixie Dust Studio Challenge: Buttons, buttons, buttons
Dutch Dare Card Challenge: Tic Tac Toe (ribbons, distressing, buttons or brads)
I think he will make a great Easter card for a boy :)
Friday, March 2, 2012
March Madness
It has hard to believe that we are already into the third month of 2012, March. A few fun things in March:
- National Craft Month – what are you creating this month?
- Red Cross Month – let’s talk about safety
- National Noodle Month – make a noodle dish for dinner!
- National Peanut Month –how many times can you eat PB this month?
- Women’s History Month – maybe a book on a woman you look up to?
- Adopt a Rescued Guinea Pig Month – hmmm....I don't think my two furry children would like this!
- National Nutrition Month - eat healthy this month...and keep it up :)
I have been having a hard time focusing on getting things done so far this year...procrastinating, feeling overwhelmed, getting side tracked...so...a plan! I am going to start making monthly goals (list...I <3 lists!) and then reviewing it at the end of the month. So, here goes...
Goals for March
1. Postings...I will post At least three times a week. Hopefully a food entry, card entry, and then a miscellaneous entry.
2. Challenges...to enter at least 3 challenges a week. I would like to find some scrapbook page challenges to do as well.
3. Scrapbook Catch Up...my big goal for 2012 was to get all books caught up, so...I need to do at least 3 layouts a week.
4. Health/Working out...has nothing to do with paper crafting, but I want to put it in writing...to continue working out 5x a week and counting calories so I can continue to lose weight. 6 pounds is my goal for the month.
5. Show a little kindness every day. I want to make it a point to be kinder every day...good deeds, compliments, helping out, sending a note to someone who needs a smile, being polite...just brighten others lives in small ways.
Wow, sounds like a lot, but I know I can do it if I can just keep focused.what are your goals for the month? How are you planning to accomplish them?
Subscribe to:
Posts (Atom)